.gif) Keyboards Maintenance
Keyboards Maintenance Keyboards Maintenance
Keyboards Maintenance allows you to setup and maintain a list of your APOS keyboards.
|
Keyboard Id |
|
|
Press on the drop down menu to select the keyboard you wish to display and work with. The default keyboard is set by entering one of the defined Keyboard Ids in Setting 47 - "Default Keyboard". |
|
Keyboard Color |
|
|
Select one of the predefined color names from the drop down menu to set the keyboard background color.
Tip - Position the mouse cursor over each color square to display the corresponding color name on GoPOS. |
|
Allow Key Resize/Move |
|
|
Pressing on the check box will allow you to resize and reposition the keys.
When enabled, to reposition a key, press and hold on the center of the key and without lifting your finger off the screen, drag the key to the new position. To resize a key, press and hold on one of the key borders and without lifting your finger off the screen, drag the edge to the desired size, either expanding or reducing the size of the key.
Pressing on a key when this check box is disabled will allow you to change the parameters of the key, but will not allow you to resize or move the key. |
|
Key Type |
||||
|
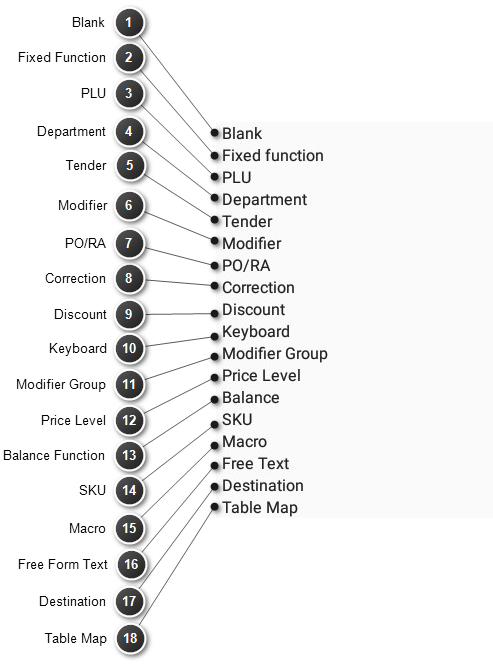
Press on the radio button for one of the supported key types.
Graphic images may be added or replaced by selecting one of the images in the drop down list. |
|
Graphic Id |
|
|
Press on the drop down list to select one of the graphic images. Please note that if this drop down list is empty or you wish to add additional graphic images to GoPOS keys, you must do this through PcProg. All graphic Images added to keys in PcProg will be transfered automatically to GoPOS when sending programs from PcProg to GoPOS. (Please see PcProg "Keys" and "Send" help topics.) |
|
Key Caption |
|
|
Enter the key name. Please note that the Default radio button will cause the key name to be overwritten with the name of the function linked to the key. If you wish to keep the name entered regardless of the chosen function, select the Fixed option. |
|
Default/Fixed |
|
|
If the Default radio button is selected, the key name will be overwritten with the name of the function linked to the key. If you wish to keep the name entered regardless of the chosen function, select the Fixed option. |
|
Number 0 |
Displays the number 0. |
|
Number 1 |
Displays the number 1. |
|
Number 2 |
Displays the number 2. |
|
Number 3 |
Displays the number 3. |
|
Number 4 |
Displays the number 4. |
|
Number 5 |
Displays the number 5. |
|
Number 6 |
Displays the number 6. |
|
Number 7 |
Displays the number 7. |
|
Number 8 |
Displays the number 8. |
|
Number 9 |
Displays the number 9. |
|
Number 00 |
Displays the value 00. |
|
Decimal Point |
Allows you to enter decimal values. |
|
Clear |
Clears the display screen once the transaction has been completed. |
|
Enter |
Completes the current action. |
|
Multiply |
Allows you to sell multiples of one item at once. In a Macro, this function may also be used to repeat the last entry made. |
|
PLU |
Allows you to enter the Product Id of the item being sold. |
|
User |
Allows you to switch users. |
|
Subtotal |
Displays the subtotal of the transaction. |
|
Copy |
Reprints the receipt of the last transaction entered. |
|
Receipt On/Off |
Turns the printing of receipts on or off. The Printer Icon displayed at the top of the unit will turn red when the receipt printing has been turned off and green when the receipt printing has been turned on. Alternatively, the user may press the printer icon to turn the receipt printing on or off, without the need to program a key. |
|
Cash Declaration |
Allows you to specify the amount on hand for each Tender. |
|
Price Check |
Allows you to verify the price of an item without a sale. When pressed a "Pc" icon will be displayed at the top of the APOS to indicate that you are currently in "Price Check" mode. |
|
Hold |
Allows you to pause the current transaction and start a new transaction. Held transactions may be recalled and completed or cancelled. |
|
Tenders |
Provides a pop-up of all defined Tenders. |
|
Corrections |
Provides a pop-up of all defined Corrections. |
|
Discounts |
Provides a pop-up of all defined Discounts. |
|
Surcharges |
Provides a pop-up of all defined Surcharges. |
|
Tax Shift #1 |
Enables/Disables the charging of Tax #1
On GoPOS, pressing a Tax Shift key will disable the corresponding tax and display a “Tax # Disabled” message. A red "T#" icon will also be displayed at the top of the APOS to indicate that you are in "Tax Shift" mode. Pressing the same Tax Shift key when the Tax has already been disabled, will re-enable the tax and display a “Tax # Active” message. The red "T#" icon will also be removed from the top of the APOS to indicate that you are no longer in "Tax Shift" mode. Tax shifts will be applied to all items within the current transaction, but will be automatically be re-enabled for the next transaction. |
|
Tax Shift #2 |
Enables/Disables the charging of Tax #2 |
|
Tax Shift #3 |
Enables/Disables the charging of Tax #3 |
|
Price Override |
Allows you to enter a price and perform a one time override of the price entered in the product maintenance screen. |
|
Tip Amount |
Allows you to enter a tip amount. |
|
Tip Percentage |
Allows you to enter a tip percentage. |
|
Food Stamp Subtotal |
Will total up all the items in the transaction, without tax, that have the food stamp option enabled. |
|
Pack |
Will add up to two digits to the front of a scanned barcode.
On GoPOS, pressing 1 => 2 => Pack before scanning a bar code will add 12 to the scanned SKU and use this new SKU to lookup the product and price. |
|
Permanent Price Override |
Allows you to override and update the current price entered in the product maintenance screen. |
|
Tare Weight |
Allows you to manually enter the Tare Weight of a scalable product. Entering the weight and pressing on the Tare Weight fixed function will display "T+ Weight entered + Base Weight Unit" at the top of the APOS to indicate that you are currently in "Tare Weight" mode. Selling a scalable product will deduct the tare weight from the total weight to calculate the price. To clear the Tare Weight, press on the Tare Weight fixed function key. To enter a new tare, enter the weight and press on the Tare Weight fixed function key. |
|
Seat |
When working with a Table, pressing on Seat will display a list of all open seats as well as an option to add a seat on the current table. Press on the seat you wish to work with or press on the next available seat# (New Seat) to add a seat to the current table. Pressing anywhere outside the pop-up window will close the window and cancel the change of seat.
When working with a Table, you may also access a seat by entering the seat# and then pressing on the Seat function. (I.E. seat# + Seat) . If the seat does not exist, a new seat will be created for the current table.
You may also access a specific table and seat by using the dotted notation. (I.E. table#.seat#) If the table does not yet exist, a new table and seat will be created. If the seat does not yet exist for the specified table, a new seat will be created. |
|
Will create a stock received entry to allow users to add to the Stock Control counter. User Option 10 - "Allow Stock Management" and Setting 96 - "Allow Stock Control on GoPOS" must be set to true to enable the Stock Control functionality on GoPOS. |
|
Will create a stock adjustment entry to allow the users to reduce the Stock Control counter. User Option 10 - "Allow Stock Management" and Setting 96 - "Allow Stock Control on GoPOS" must be set to true to enable the Stock Control functionality on GoPOS. |
|
Report in X Mode |
Entering the Report Id and then pressing on the key will generate the specified report in X Mode. User must have X rights. Warning: The report will be printed on the receipt printer. |
|
Consolidated Report in X Mode |
Entering the Report Id and then pressing on the key will generate the specified report in X Mode, consolidating the reports from all APOS devices defined in the network. User must have X rights. Warning: The report will be printed on the receipt printer. |
|
Report in Z Mode |
Entering the Report Id and then pressing on the key will generate the specified report in Z Mode. User must have Z rights. Warning: The report will be printed on the receipt printer. |
|
Consolidated Report in Z Mode |
Entering the Report Id and then pressing on the key will generate the specified report in Z Mode, consolidating the reports from all APOS devices defined in the network. User must have Z rights. Warning: The report will be printed on the receipt printer. |
|
Fiscal Invoice |
Will display a pop-up screen on GoPOS allowing the user to capture client data required for Fiscal Invoices.
|
|
|
|
|
|
|
|
|
|
|
|
|
|
|
|
|
|
Function |
|
|
Select one of the supported fixed functions or one of the defined items from the chosen function type. |
|
Text Color |
|
|
Select one of the predefined colors from the drop down menu to set the keyboard background color.
Tip - Position the mouse cursor over each color square to display the corresponding color name on GoPOS. |
|
Key Color |
|
|
Select one of the predefined colors from the drop down menu to set the keyboard background color.
Tip - Position the mouse cursor over each color square to display the corresponding color name on GoPOS. |
|
Add new key |
|
|
Press on this button to insert a new key on the bottom left of the key layout area.
Please note that you must enable "Allow Key Resize/Move" by pressing on the check box if you wish to resize and reposition the key. |
|
Add New Keyboard |
|
|
Press on this button to add a new keyboard. A pop up window will allow you to choose the grid size of the keyboard you would like to start with. Press on the radio button next to the desired grid size and press continue.
If "Empty Keyboard" was chosen, a new blank keyboard will be displayed, allowing you to manually add keys to your keyboard.
If a grid size was chosen, a new keyboard will be displayed filled with blank keys based on the grid size chosen. For example if a grid size of 2 x 12 was chose, 24 blank keys will be created and placed in each of the grid cells. You may then modify each key to suit your requirements.
Please note that the grid sizes will vary based on the APOS unit and layout area you are working with. |
|
Save |
|
|
Press "Save" to close the window and return to the previous screen. All modifications made will be saved. |
|
Back |
|
|
Press "Back" to close the window. If any changes have been made, press on SAVE to save the modifications or press on IGNORE to return to the previous screen without saving any changes.
|
|
Hide |
|
|
Press "Hide" to hide the android keyboard when displayed. |
|
Key Layout Area |
|
|
The key layout area will be drawn and positioned based on the APOS type your are currently working on.
AP01 - Portrait Layout - 720 x 1280
AP02 - Portrait Layout - 800 x 1280
AP03 - Portrait Layout - 800 x 1280
AP04 - Landscape Layout - 1280 x 800
AP05, AP05L and AP06 - Landscape Layout - 1920 x 1080
|
.png)
-number-1.png)
-number-2.png)
-number-3.png)
.png)
-number-4.png)
-number-5.png)
-number-6.png)
-number-7.png)
-number-8.png)
-number-9.png)
.png)
-number-10.png)
-number-11.png)
(1).png)
-number-12.png)
(2).png)
-number-13.png)
-number-14.png)
-number-15.png)
-number-16.png)
.png)
-number-17.png)
-number-18.png)
.png)
-number-19.png)
-number-20.png)
.png)
.png)
.png)
.png)
.png)