Settings Options Maintenance


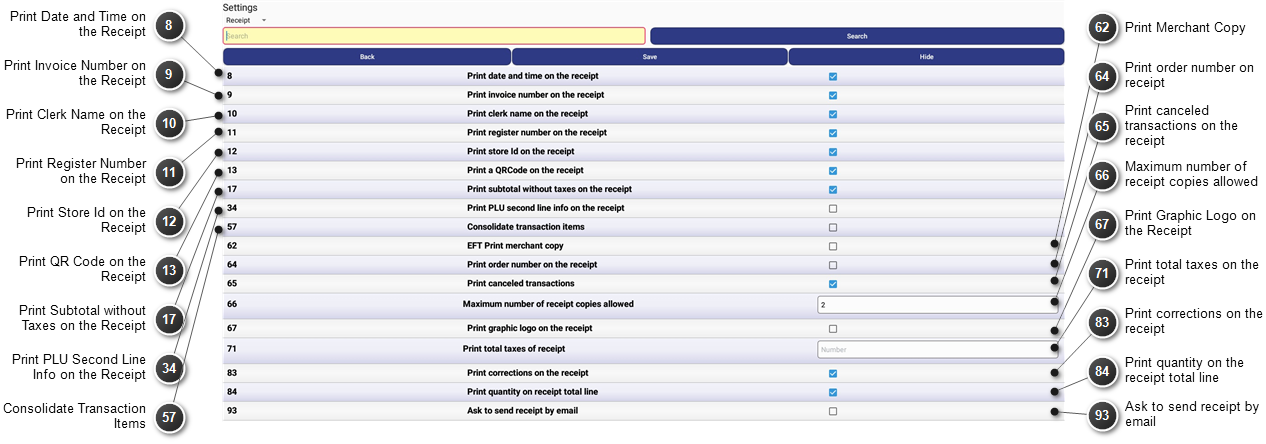
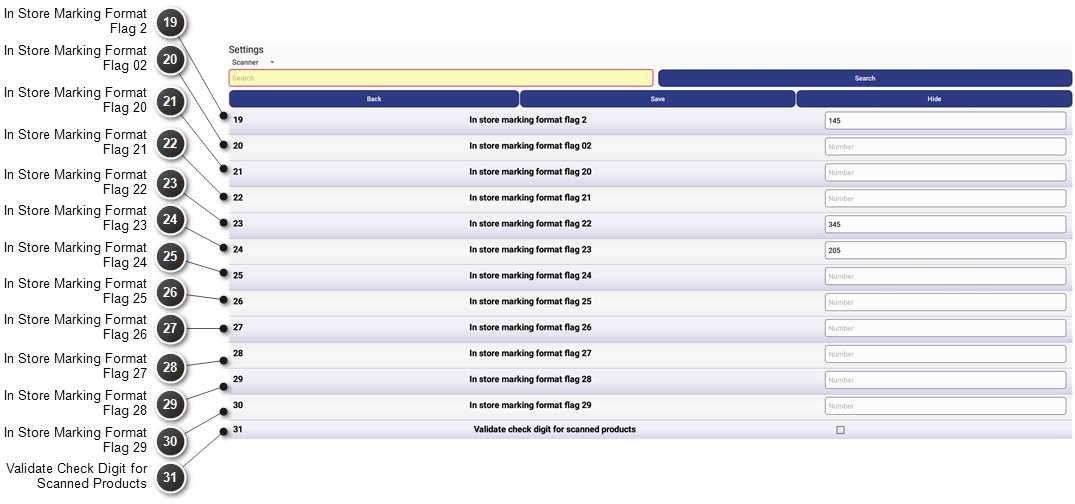
Settings Options Maintenance allows you change the system setting options for your GoPOS Point of Sale devices.


Settings Groups

The maintenance screen can be viewed by setting number (All) or grouped into the following additional six tabs:


General

These settings are used to control display and user options.


Culture

A list of cultures will be created from the input languages installed on your computer. You must select a culture linked to one of the supported languages (English, French or Spanish). If a non supported culture is chosen, the default language of English will be used. Once a change to the culture is made, you must shut down and restart the PcProg application for the corresponding display language to take effect. On GoPOS the culture affects the display of monetary values and date formats only. The display language in GoPOS is controlled by the default language setup in the Android settings.

Number of Decimal Digits

Enter the number of decimal digits to display in this application and on the GoPOS system.

Store Id

Enter the store name or identification. This text will be printed on the customer receipt if Settings 12 - "Print Store Id on the Receipt" has been set to true.

Register Number

Enter the Point of Sale register number. Each POS should have a unique number from one to the total number of registers in the network. This will allow the application to find and communicate with individual registers. This setting should be verified and set directly on each APOS unit. When updating the register number on GoPOS, you must reboot the unit before the change will take effect.

Quantity of Registers in the Network

Enter the total number of GoPOS registers on the network. This value is used when communicating with multiple registers on the network. PcProg will attempt to find the first register using the base IP entered and increment this IP by 1 until the quantity of registers in the network has been reached. This setting is also used by inter-register communication (IRC).

Base Weight Unit

Select one of the defined units of measurement (kg, g, lb, oz). This unit will print on the receipts when using scalable products sold by weight and they are flagged to Print the Weight/Volume Info Line.

Enter Decimals as Integers

Select this option to enter decimal values as Integer values, without the decimal separator. If this value is enabled (set to true) you are allowed to enter numbers with or without the decimal separator. For example entering 700 or 7.00 will both be interpreted as 7.00. If this value is disabled (set to false) 700 will be interpreted as 700.00. Please note that the previous examples given assume that Setting 6 - "Number of decimal digits is set to 2. If the number of decimal digits was set to 3 and Setting 32 was enabled, 700 will be interpreted as 0.700 and 7000 will be interpreted as 7.000.

Automatic Login with First Clerk

Select this option if you want the POS system to automatically login with the first clerk defined. If this option is not chosen, after each GoPOS re-start, a manual login will be required before being allowed to enter transactions.

TCP Port for Communication

Enter the TCPIP port for POS communication. This port will be used to communicate with all registers. Please note that when sending and receiving files to and from GoPOS, the IP and Port entered on PcProg must match the IP and Port of the APOS unit. If a change is made to the Port on GoPOS, you should reboot the unit to properly initiate the change in the communication protocol.

Local Currency Prefix

Enter the currency symbol used for the local currency.

Floating Balances

Enabling floating balances will allow you to transfer table, room or account balances between multiple APOS units. For example, you can Open an Account on APOS 1 and enter transactions. Once you close this account on APOS 1, the Account and balance would be replicated on all other APOS units defined on your system. You could then walk over to APOS 2 and re-open the same Account and enter new transaction. Once the account is closed on APOS 2,  the updated account balance would be replicated on all terminals. You could then walk over to APOS 3 and re-open and tender the same account. The updated account balance would be replicated on all terminals but would no longer be available to re-open on any of the terminals, since it was Tendered and Closed.


All APOS units must be properly defined with a unique register number (Setting 15) and a fixed sequential terminal IP address. Setting 16 must also be set to the number of APOS units in your network. If properly setup, this should equal the maximum unique register number entered. For example, if you have 3 APOS units, then each APOS will have a unique register number starting with 1 (1, 2 and 3) and all units must have the number of APOS units in the network set to 3. As indicated, each APOS must also have a fixed sequential terminal IP address. So, if the base IP of unit 1 is X.X.X.201, then unit 2 must have a fixed IP of X.X.X.202 and unit 3 must have a fixed IP of X.X.X.203.


Please note that when updating the register number on GoPOS, you must reboot the unit before the change will take effect.

Default Keyboard

Enter the keyboard ID of the default keyboard. This setting will be used to determine the initial display on the APOS devices when the user presses the Register button on the GoPOS Home menu.

Automatic Logout

Enter the idle time, in seconds, before automatic logout. If there is no activity between transactions and GoPOS has reached the defined idle time, the transaction screen will be cleared and the user will be logged out. The user must then log back in to enter any new transactions. Enter zero for no automatic logout.

Cash Rounding

The rounding option chosen will be applied to all Tenders that have the Rounding option set to true in the Tenders Maintenance module.


Select one of the following options:


No Rounding

Select this option if no rounding should occur.

Swiss Rounding

Select this option to round cash decimal values to the nearest $0.05 cent value.Payments made in cash round to the nearest $0.05.


Round Down 

$1.01 or $1.02 round down to $1.00

$1.06 or $1.07 rounds down to $1.05


Round Up

$1.03 or $1.04 round up to $1.05

$1.08 or $1.09 round up to $1.10


Note: Sale totals including taxes are calculated to the penny. Only the total cash payment or change made for a cash payment is rounded to the nearest $0.05.

4/10 Rounding

Select this option to round cash decimal values to the nearest $0.10 cent value. Payments made in cash round to the nearest $0.10.


Round Down

$1.01, $1.02, $1.03 or $1.04 round down to $1.00


Round Up

$1.05, $1.06, $1.07, $1.08 or $1.09 round up to $1.10


Note: Sale totals including taxes are calculated to the penny. Only the total cash payment or change made for a cash payment is rounded to the nearest $0.10.

Rounding up to even

Select this option to round cash decimal values up to the nearest $0.02 cent value. Payments made in cash round to the nearest $0.02.


Round Up

$1.01 round up to $1.02

$1.03 round up to $1.04

$1.05 round up to $1.06

$1.07 round up to $1.08

$1.09 round up to $1.10


Note: Sale totals including taxes are calculated to the penny. Only the total cash payment or change made for a cash payment is rounded to the nearest $0.02.


Operation's counter never resets

A transaction Id is generated using the operation counter and the Z counter. If, for example, the register performed 100 transactions, the last transaction Id of the day will be 001000100. The following day with this option enabled (set to true), the transaction counter will not be reset and the first transaction on day 2 will be 002000101. If this option is disabled (set to false), the transaction counter will reset and the first transaction on day 2 will be 002000001.

Subtotal compulsory before tender

If this option is selected, users must press the subtotal key before tendering and terminating the transaction.

Hide numeric keypad

Select this option if you wish to hide the fixed numeric keypad on the bottom left of the GoPOS register. Please note that many of these fixed functions are required to enter and complete transactions. It is assumed that if the fixed numeric keypad is hidden, the fixed function keys required by the user will be added to the keyboard in Keys Maintenance.

Manager required for price overrride

If enabled, managerial rights will be required to override prices on the GoPOS system. To override the set price of a product, enter the price, press the "price override" key and select the product.

Floating Users

Enabling floating users will allow you to make changes to the users directly on your APOS and have those changes replicated on all APOS units defined in your network. All APOS units must be properly defined with a unique register number (Setting 15) and a fixed sequential terminal IP addresses. Setting 16 must also be set to the number of APOS units in your network.


All APOS units must be properly defined with a unique register number (Setting 15) and a fixed sequential terminal IP address. Setting 16 must also be set to the number of APOS units in your network. If properly setup, this should equal the maximum unique register number entered. For example, if you have 3 APOS units, then each APOS will have a unique register number starting with 1 (1, 2 and 3) and all units must have the number of APOS units in the network set to 3. As indicated, each APOS must also have a fixed sequential terminal IP address. So, if the base IP of unit 1 is X.X.X.201, then unit 2 must have a fixed IP of X.X.X.202 and unit 3 must have a fixed IP of X.X.X.203.


Please note that when updating the register number on GoPOS, you must reboot the unit before the change will take effect.

PopUpList item height

Enter the height of the individual items in the PopUpLists displayed on GoPOS. Must be a valid integer between 1 and 100 pixels.

Display subtotals with taxes

This option will determine if the Cash and Credit subtotals should be displayed on GoPOS with or without taxes.

Tender Discount/Surcharge

Enter 0 for no automatic cash discount or credit card surcharge while tendering on GoPOS or enter the id of one of the defined discounts/surcharges. If enabled, two subtotals will be displayed on the GoPOS register. The total on the bottom left will display the adjusted amount based on the discount or surcharge defined. the total on the bottom right will display the non-adjusted transaction amount. Both of these totals can be displayed with or without taxes as well as with or without rounding.

Base volume unit

Enter the base volume unit of measurement. This unit will print on the receipts when using products sold by volume and they are flagged to Print the Weight/Volume Info Line.

Display Subtotals with rounding

This option will determine if the Cash and Credit subtotals should be displayed on GoPOS with or without rounding. A valid rounding option must be defined for rounding to occur.

Destination compulsory before tender

If this option is enabled (set to true) you will be forced to enter an order destination before completing a transaction. If you attempt to tender a transaction without first declaring the order destination a warning message will be displayed on GoPOS.

Balance selection compulsory

If this option is enabled (set to true) you will be forced to select an account balance before starting a transaction.

Reset price level after item sale

When this option is enabled (set to true) all price level changes, will be reset to the user's default price level after each item sale.

Reset price level after transaction

When this option is enabled (set to true) all price level changes, will be reset to the user's default price level after each transaction.

Reset keyboard after item sale

If this option is enabled (set to true) the default keyboard will be displayed after each item sale.

Reset keyboard after transaction

If this option is enabled (set to true) the default keyboard will be displayed after each transaction.

Screen Saver Timer in seconds

Enter the idle time, in seconds, before the screen saver is activated. Enter zero for no screen saver.

Clear customer display after transaction

Select this option if the customer display should be cleared after each transaction.

Tip Suggestion 1

Enter the first suggested tip amount as a percentage.

Tip Suggestion 2

Enter the second suggested tip amount as a percentage.

Tip Suggestion 3

Enter the third suggested tip amount as a percentage.

Enable Fiscal Mode

Select this option to enable the Puerto Rico YCS PR Fiscal Mode.

Use Enhanced Cash Declaration

Enabling this option will speed up the cash declaration and minimize entry errors by displaying a dialogue with all defined currency denominations. This will allow the user to simply enter the quantity of each denomination while performing the cash declaration. When disabled, the clerk must enter both the quantity and the denomination of the currency.

Allow Stock Control on GoPOS

Stock control can be managed directly on GoPOS when this setting is enabled. Users will be allowed to enter stock received and stock adjustments if they have been granted User Option 10 - "Allow Stock Management". All sale transactions on GoPOS will directly update stock control to adjust stock on hand. Please note that when stock control has been enabled on GoPOS, it will no longer be available on PcProg.


Products

These settings control department and product settings.


Individual Options for Products

Select whether product options should be set at the department or product level. All product options will default from the chosen department, but may be overridden if this option is enabled.

Individual Print Options for Products

Select whether product print options should be set at the department or product level. All product print options will default from the chosen department, but may be overridden if this option is enabled.

Individual Taxes for Products

Select whether taxes should be set at the department or product level. All product tax options will default from the chosen department, but may be overridden if this option is enabled.

Price Level Quantity

Enter the amount of price levels supported for each product. Integer value from 1 to 10. A new Price Level column will appear in Product Maintenance which will allow you to enter a different price for each price level defined. On GoPOS, pressing a key that is linked to a Price Level will change the price of any new items added to the transaction. The user must be granted access to each specific Price Level in User Maintenance.

Product Lookup by SKU

Select this option if you wish to allow product Lookups by SKU on the GoPOS system. If this option is not enabled, the PLU will be used to lookup products when a number is entered and the PLU fixed function key is pressed.

Individual Modifier Groups for Products

Select whether modifier groups should be set at the department or product level. All product modifier groups will default from the chosen department, but may be overridden if this options is enabled.

Floating products

Enabling floating balances will allow you to make product changes directly on your APOS and have those changes replicated on all APOS units defined in your network. All APOS units must be properly defined with a unique register number (Setting 15) and a fixed sequential terminal IP addresses. Setting 16 must also be set to the number of APOS units in your network.


All APOS units must be properly defined with a unique register number (Setting 15) and a fixed sequential terminal IP address. Setting 16 must also be set to the number of APOS units in your network. If properly setup, this should equal the maximum unique register number entered. For example, if you have 3 APOS units, then each APOS will have a unique register number starting with 1 (1, 2 and 3) and all units must have the number of APOS units in the network set to 3. As indicated, each APOS must also have a fixed sequential terminal IP address. So, if the base IP of unit 1 is X.X.X.201, then unit 2 must have a fixed IP of X.X.X.202 and unit 3 must have a fixed IP of X.X.X.203.


Please note that when updating the register number on GoPOS, you must reboot the unit before the change will take effect.

Individual Promotions for Products

Select whether product promotions should be set at the department or product level. All product promotions will default from the chosen department, but may be overridden if this options is enabled.


Receipts

These settings let you decide what information is printed on customer receipts.


Print Date and Time on the Receipt

Select this option to print the current date and time on the receipt. "Date:" followed by the long form of the current date will be printed at the bottom of the receipt.

Print Invoice Number on the Receipt

Select this option to print the invoice number on the receipt. "Trans:" followed by the transaction number will be printed at the bottom of the receipt.

Print Clerk Name on the Receipt

Select this option to have the clerk name printed on the receipt. "Clerk:" followed by the user name will be printed at the bottom of the receipt.

Print Register Number on the Receipt

Select this option to print the register number on the receipt. "POS #:" followed by the register number will be printed at the bottom of the receipt.

Print Store Id on the Receipt

Select this option to print the store Id on the receipt. "Store:" followed by the store Id will be printed at the bottom of the receipt.

Print QR Code on the Receipt

Select this option to print the QR code on the receipt. When scanned by a QR reader, the receipt information is displayed in a table format. Future enhancements will allow you to scan the QR code to directly recall the transaction on GoPOS.


If enabled, a QR code will also be added when printing Account and Table balances. Scanning the QR code will recall and display the account or table balance if the account is still active.

Print Subtotal without Taxes on the Receipt

Select this option to print subtotals without taxes on the receipt. "SUBTOTAL" and the total transaction amount before taxes will be printed on the receipt.

Print PLU Second Line Info on the Receipt

Select this option to print the PLU second line information on the Receipt. The PLU number, SKU number and unit price of the product will be printed as a second product line for each product in the transaction.

Consolidate Transaction Items

Select this option to consolidate individual product sales under one heading on the receipt. If multiple transactions are entered using the same product, the total number and total price of the items will be displayed under one product heading.

Print Merchant Copy

Select this option to print an additional EFT Merchant copy of the receipt. This option is only valid when there is an EFT device linked to the tender. After printing the customer receipt the system will print a merchant copy showing the transaction payment details.

Print order number on receipt

Select this option to print an order number on the receipt. A unique order number will be generated automatically using the current transaction number and printed at the top of the receipt.

Print canceled transactions on the receipt

Select this option to print cancelled transactions on the receipt. If disabled, no receipt will be printed when a transaction is cancelled.

Maximum number of receipt copies allowed

Enter the maximum number of receipt copies allowed. A value of zero indicates no receipt copies will be allowed.

Print Graphic Logo on the Receipt

Select this option to print a graphic log on the receipt. A valid black and white image must be linked to the printer in Hardware Maintenance. A separate graphic logo may be specified for 58mm and 80mm paper.

Print total taxes on the receipt

Enter the description of the total taxes to be displayed on the receipt. A null or empty value will indicate that taxes should not be totalled.

Print corrections on the receipt

Select this option if you wish to print deleted or error corrected transactions on the receipt.

Print quantity on the receipt total line

Select this option if you wish to print quantities on the receipt total line.

Ask to send receipt by email

Select this option if you wish GoPOS to display a prompt asking customers if they would like their receipt sent by email.


The clerk may select "Print only", "Email only" or "Print and email".

If "Print only" is selected, the receipt will be printed.

If "Email only" is selected the receipt will be emailed to the address entered in the Email field and will not be printed.

If "Print and email" is selected the receipt will be emailed to the address entered in the Email field and will also be printed.


Scanners

These settings allow you to customize scanner bar codes and functionality. The system currently supports both Universal Product Code (UPC) and European Article Number (EAN) barcode formats. The UPC format is used primarily in the US and Canada, while the EAN is used everywhere else globally. The EAN barcode and UPC barcode are the same, except for the placement of the human readable numbers below each code. These numbers are only there as a back-up in case the barcode does not scan properly, and the information must be manually entered into the register or point of sale system. If a manually entered or scanned item is not found, the GoPOS system will display a warning message and emit a sound.


The format of the barcode must be F, Code, PCD, P, CD.

Where:


F          Format Flag - This must be one of the supported In-store Marking Format Flags (2, 02, 20 - 29) defined in Settings 19-30.

Code          Department or Product Id (SKU) - Numeric values.

PCD          Price Check Digit for price or quantity - Optional system generated digit to ensure the price is valid.

P          Price or quantity - Numeric values with no decimal or commas.

CD          Check Digit - System generated digit to ensure the bar code is valid.


The format of the In-store Marking Flag, defined in Settings 19-30 must be XYZ.

Where:

X - Value from 1 to 3 where:

1.       The Code is used as PLU number and the flag is included in the PLU number.

2.       The Code is used as PLU number and the flag is not included in the PLU number.

3.       The Code is used as Department number and the flag is not include in the Department number.

Y - Code value from 0 to 5 where:

0.       The Code is interpreted as quantity code with no decimals.

1.       The Code is interpreted as quantity code with 1 decimal.

2.       The Code is interpreted as quantity code with 2 decimals.

3.       The Code is interpreted as quantity code with 3 decimals.

4.       The Code is interpreted as price with 2 decimals and no Price Check Digit.

5.       The Code is interpreted as price with Price Check Digit.

Z - Number of digits from 0 to 9 for quantity or price.

UPC 12-digit example:

·         145 - 212345004555 - $4.55 on product 212345

·         245 - 212345004555 - $4.55 on product 12345

EAN 13-digit example:

·         345 - 2200001004559 - $4.55 on department 1

·         205 - 2312345000026 - 2 units of product 12345


Scanners (Continued)


In Store Marking Format Flag 2

Universal Product Code (UPC) - Enter the in-store marking format flag number 02 (Blank).

In Store Marking Format Flag 02

Universal Product Code (UPC) - Enter the in-store marking format flag number 02 (Blank).

In Store Marking Format Flag 20

European Article Number (EAN-13) - Enter the in-store marking format flag number 20 (Blank).

In Store Marking Format Flag 21

European Article Number (EAN-13) - Enter the in-store marking format flag number 21 (Blank).

In Store Marking Format Flag 22

European Article Number (EAN-13) - Enter the in-store marking format flag number 22 (345).

In Store Marking Format Flag 23

European Article Number (EAN-13) - Enter the in-store marking format flag number 23 (205).

In Store Marking Format Flag 24

European Article Number (EAN-13) - Enter the in-store marking format flag number 24 (Blank).

In Store Marking Format Flag 25

European Article Number (EAN-13) - Enter the in-store marking format flag number 25 (Blank).

In Store Marking Format Flag 26

European Article Number (EAN-13) - Enter the in-store marking format flag number 26 (Blank).

In Store Marking Format Flag 27

European Article Number (EAN-13) - Enter the in-store marking format flag number 27 (Blank).

In Store Marking Format Flag 28

European Article Number (EAN-13) - Enter the in-store marking format flag number 28 (Blank).

In Store Marking Format Flag 29

European Article Number (EAN-13) - Enter the in-store marking format flag number 29 (Blank).

Validate Check Digit for Scanned Products

All supported scanner are plug and play but must be configured to send the carriage return, with or without a check digit. If the scanner is set up to send check digits, then bar codes in the system need to be created with check digits and this option must be enabled. If the scanner is set up to not send check digits, then bar codes in the system need to be created without check digits and this option must be disabled.


Transfer Movil/En Zona

Caribbean Installations Only.

Reports

These settings allow you to customize report names and options.


Extra Info on PLU computer reports

Select this option if you want extra product information printed on the PLU Reports.

Cash declaration mandatory for clerks report

Select this option if a cash declaration is mandatory before the clerk reports can be generated. You must have at least one tender with the Requires Cash Declaration option enabled.

Report Period 1

Enter the name of the report for Period 1. The report name for Period 1 will default to “Daily Report”.

Report Period 2

Enter the name of the report for Period 2. The report name for Period 2 will default to “Weekly Report”.

Report Period 3

Enter the name of the report for Period 3. The report name for Period 3 will default to “Monthly Report”.

Report Period 4

Enter the name of the report for Period 4. The report name for Period 4 will default to “Yearly Report”.

Print grand total on Z reports

Disable this option if you do not want to see the old and new grand totals when generating Z period reports on the APOS.

Allow Z Reports with Open Tables

Disable this option if you do not want to allow the generation of Z period reports on the APOS if there any Tables with open balances.

Allow Z Reports with Transaction Holds

Disable this option if you do not want to allow the generation of Z period reports on the APOS if there any Transactions on Hold.

Use individual counter for each report

Select this option if you want GoPOS to track individual X and Z counters for each report type on GoPOS.

If enabled, GoPOS will only increase the X or Z counter for the specific report type being generated (Clerk Report, All Clerk Report, Daily Report, Weekly Report, Monthly Report, Yearly Report, Items Report, Hourly Report or Journal report).

If disabled, a single X counter will be increased each time a new report is generated and a single Z counter will be increased each time a new report is generated and cleared. The individual X and Z counters for each specific report type will no longer be updated.

Please note that the X and Z counters on PcProg are independent of the X and Z counters on GoPOS. Downloading reports from GoPOS to PcProg will not impact the X and Z counters on GoPOS. Each Report Type on PcProg (Period Report, Clerk Report or Journal Report) will have it's own X and Z counter. This means that each time one of the period reports is downloaded to PcProg, the Period X counter will be increased and each time one of the period reports is cleared, the Period Z counter will be increased.


Search Text

Press in this field and using the pop-up keyboard enter the text you wish to search for.

Search

Press on this button to search for the entered text.

Back

Press on this button to close the window and return to the previous window without saving your changes.

Save

Press on this button to save your changes.

Hide

Press on this button to hide the android keyboard.